Search This Blog

Tuesday, December 21, 2021

Binoculars give your cellphone real telephoto

    For many people, cellphones are their cameras.

    On the one hand, most of us always have them with us, they're stupid simple to operate and, depending on your phone, can produce a decent picture.

    But they have a few drawbacks. The most obvious one is that most of them don't have an actual telephoto function.

    Most cellphone cameras give you the option to zoom in, but that is a digital zoom. Rather than actually magnifying the image as an optical zoom lens does, digital zooming merely crops the picture and then stretches that part of the image across the "canvas" of the image. That might be fine for a minor adjustment, but if you're really trying to see something far off, it is going to be a pixelated mess.

    Frankly, I consider digital zoom as one of the great frauds perpetrated upon consumers.

    But I saw someone suggest a way to get a relatively decent optical telephoto with a cellphone camera. It involves using binoculars.

    What you do is first focus your binoculars on the subject you're looking at, and then put the cellphone's camera lens against one of the eyepieces and take your picture.

    You get a picture that covers a small part of the sensor, but it's a true optical enlargement of the image. You can crop it and it still looks more decent than a digital zoom.

    Here's a few shots I did to test this.

This one is with the camera at its default focal length.


Now, we're looking through the binocular eyepiece and you can see the enlargement of the image.
 

Cropped to make it square.

    It's not the sharpest image, but it is better than what you would get with digital zoom.

    The biggest challenge is juggling the binocular and cellphone, especially if you can't rest the binoculars on a steady object, like a railing. And since you are using an extreme focal length in comparison to your sensor size (unless you're using a high-end cellphone, your sensor's going to be about as big as the fingernail on your pinkie), any minor movement in your hands is going to make it shake like a major earthquake.

    But it offers a way to get a close-up view. You can also use this technique on a telescope if you want to get a close-up picture of the Moon with your phone.


Tuesday, December 7, 2021

DIY hack lets you get Gary Fong-like lighting from your speed light

    Speed lights, or flashes as we used to call them, are great for getting lighting where it's needed.

    But, in their basic, unmodified state, they produce a light that's pretty hard and not flattering. 

    So far, I've shown how you can make bounce cards and soft boxes that will take the edge off that harsh light and make your subject look better.

    Another device for doing this is the Lightsphere developed by Gary Fong. It's essentially a translucent plastic-and-silicone sphere that attaches to your flash and provides a diffused light for your subject.

    I remember seeing one in a picture of a press scrum at a Mitt Romney campaign event and joking that it looks like Mystery Science Theatre 3000's Tom Servo is a Romney supporter. 

    The concept is actually quite good, especially when you're in places where there isn't a white ceiling and/or wall to bounce a flash.

    But it comes with a $70 price tag, which can be a "hard nope" for some people.

    However, there's a way to get the same effect at a fraction of the price, and all it requires is a trip to the local department store for a few odds and ends. Specifically, you'll need a plastic drawer/shelf liner (not the self-adhesive kind) and velcro tape.

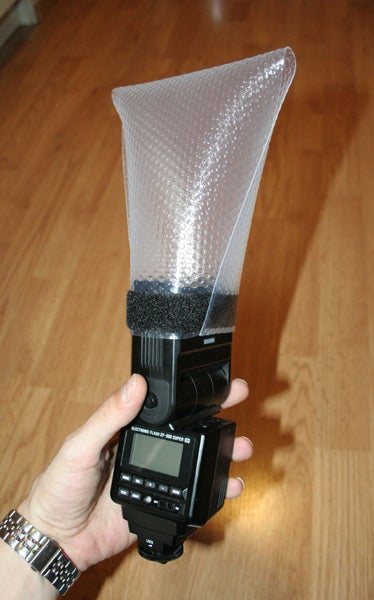
    As shown on Instructables, you cut a 15-by-6-inch piece out of the shelf liner, apply the velcro on the narrow ends of the piece on opposite sides and then you wrap it around your flash.

DIY Gary Fong Lightsphere

    It should look like this when you're done. (Photo credit: Arthur Gajewski, cc-by-sa)

    You'll notice it appears to be sideways on the flash, but that allows you to effectively use it whether you're holding the camera in a landscape or portrait orientation.

     So, how does it work?

    Allen Mowery did a Youtube video demonstrating. Check it out. I think I'll be adding one to my ever cramped camera bag.