Search This Blog

Tuesday, December 21, 2021

Binoculars give your cellphone real telephoto

    For many people, cellphones are their cameras.

    On the one hand, most of us always have them with us, they're stupid simple to operate and, depending on your phone, can produce a decent picture.

    But they have a few drawbacks. The most obvious one is that most of them don't have an actual telephoto function.

    Most cellphone cameras give you the option to zoom in, but that is a digital zoom. Rather than actually magnifying the image as an optical zoom lens does, digital zooming merely crops the picture and then stretches that part of the image across the "canvas" of the image. That might be fine for a minor adjustment, but if you're really trying to see something far off, it is going to be a pixelated mess.

    Frankly, I consider digital zoom as one of the great frauds perpetrated upon consumers.

    But I saw someone suggest a way to get a relatively decent optical telephoto with a cellphone camera. It involves using binoculars.

    What you do is first focus your binoculars on the subject you're looking at, and then put the cellphone's camera lens against one of the eyepieces and take your picture.

    You get a picture that covers a small part of the sensor, but it's a true optical enlargement of the image. You can crop it and it still looks more decent than a digital zoom.

    Here's a few shots I did to test this.

This one is with the camera at its default focal length.


Now, we're looking through the binocular eyepiece and you can see the enlargement of the image.
 

Cropped to make it square.

    It's not the sharpest image, but it is better than what you would get with digital zoom.

    The biggest challenge is juggling the binocular and cellphone, especially if you can't rest the binoculars on a steady object, like a railing. And since you are using an extreme focal length in comparison to your sensor size (unless you're using a high-end cellphone, your sensor's going to be about as big as the fingernail on your pinkie), any minor movement in your hands is going to make it shake like a major earthquake.

    But it offers a way to get a close-up view. You can also use this technique on a telescope if you want to get a close-up picture of the Moon with your phone.


Tuesday, December 7, 2021

DIY hack lets you get Gary Fong-like lighting from your speed light

    Speed lights, or flashes as we used to call them, are great for getting lighting where it's needed.

    But, in their basic, unmodified state, they produce a light that's pretty hard and not flattering. 

    So far, I've shown how you can make bounce cards and soft boxes that will take the edge off that harsh light and make your subject look better.

    Another device for doing this is the Lightsphere developed by Gary Fong. It's essentially a translucent plastic-and-silicone sphere that attaches to your flash and provides a diffused light for your subject.

    I remember seeing one in a picture of a press scrum at a Mitt Romney campaign event and joking that it looks like Mystery Science Theatre 3000's Tom Servo is a Romney supporter. 

    The concept is actually quite good, especially when you're in places where there isn't a white ceiling and/or wall to bounce a flash.

    But it comes with a $70 price tag, which can be a "hard nope" for some people.

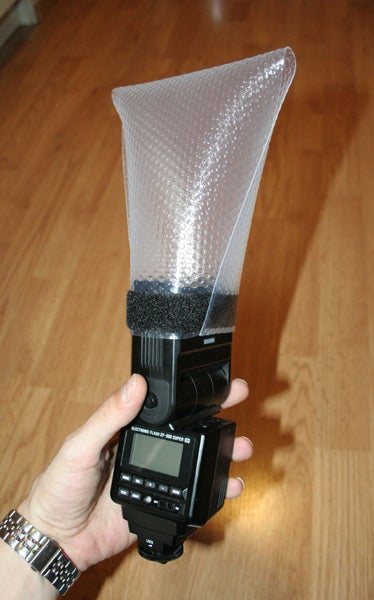
    However, there's a way to get the same effect at a fraction of the price, and all it requires is a trip to the local department store for a few odds and ends. Specifically, you'll need a plastic drawer/shelf liner (not the self-adhesive kind) and velcro tape.

    As shown on Instructables, you cut a 15-by-6-inch piece out of the shelf liner, apply the velcro on the narrow ends of the piece on opposite sides and then you wrap it around your flash.

DIY Gary Fong Lightsphere

    It should look like this when you're done. (Photo credit: Arthur Gajewski, cc-by-sa)

    You'll notice it appears to be sideways on the flash, but that allows you to effectively use it whether you're holding the camera in a landscape or portrait orientation.

     So, how does it work?

    Allen Mowery did a Youtube video demonstrating. Check it out. I think I'll be adding one to my ever cramped camera bag.


Tuesday, November 23, 2021

Household photography hacks

    When he was the host on DigitalRev TV, Kai Wong did a video showing a few DIY photo hacks done mostly with items found around the house.

    Among the hacks he shows are filling a bag with popcorn kernels to use as a makeshift stabilizer, using a couple key rings and zip ties to hook a strap to your tripod and using an old nylon stocking as a soft-focus filter.

    Some of the hacks are worth trying out, although if you are going to do the Vaseline diffuser, I would probably get a cheap UV filter dedicated to that rather than trying to hold up a sheet of glass in front of your lens.

    Do any of these interest you? Or do you have a suggestion on household photo hacks?

Tuesday, November 9, 2021

How to turn a dishpan and cake dish into a monster DIY studio light

    If you are looking for a way to really light up what you are shooting, you might want to take a trip to the kitchen aisle of the local store.

    Griffin Hammond, of Indy Mogul fame, did this video showing his plans for a DIY studio light that had the output of the equivalent of 13 60-watt incandescent light bulbs. While the video is about nine years old, his idea is still a good one.

    His light uses a deep plastic dishpan for a reflector around the lights, which are in socket splitters in four light sockets, with the cake pan serving as the electrical box for the rig.

    Griffin's rig uses eight 100-watt-equivalent CFL bulbs, but LED bulbs should work just as well. He estimated the cost of the rig at $85, but it's not a bad price if you compare it to a commercial rig with similar output.

    You can also lower that price point by purchasing some of the supplies at your local dollar store instead of the big box stores. You'll probably still need to go to the hardware store for the lighting rigs.

    Griffin's rig requires some knowledge of electrical wiring, and his video doesn't clearly show the wiring pattern. If you'd rather not bother with making your own electrical circuits, some of the commenters on the video suggested using a power strip with plug-in light sockets, simplifying that part of the project.

    I would probably paint the outside of the pan black, giving it a better appearance as well as minimizing light spill.

    From his video, it looks like a great option if you're shooting video or prefer to use continuous lighting in your photo studio.


Tuesday, October 26, 2021

Getting close to eliminate reflections

    There are times when you want a reflection in you picture for artistic purposes, but there are more than a few times when it's a pain in the tuchus.

    This usually happens when what you're photographing is behind glass, such as in a display case, you're looking out a window or standing on top of the Space Needle in Seattle, where even on the outdoor deck you're behind glass.

    Some ways to get rid of the reflection, if it's ruining your composition, include changing your angle so the reflection isn't going straight into your camera lens (angle of incidence = angle of reflection) or using a polarizing filter.

    The only drawbacks with those methods is you might be limited in moving to the sides, and the light may be at the wrong angle for a polarizer, which works best when the light's coming from a right angle.

    While reflections can be eliminated in post (I had to do that with a picture I took of a stained glass window in a museum), that can be extra work you wouldn't need to do if you can eliminate the reflection before you trip the shutter.

    But Jefferson Graham, a writer/photographer/Youtuber, suggests getting right up against the glass.

    It's not a bad strategy, as you are blocking the light causing the reflection from your lens.

    (Do not try this tip with a museum display case. You may either knock over the display or set off an alarm.)

    The only thing I take issue with him on this matter is his suggestion that this option only works with phone cameras, as they typically have a flat lens. A DSLR, he argues, has a curved lens and can't be put in such contact.

    To which I call shenanigans.

    First, most of us use UV or skylight filters on the front of our lenses to protect them from damage, so we do have a "flat" surface to put against the glass.

    Second, a lens hood also provides the shading that can keep the stray light from messing up your photo. It works especially well if you have a collapsible rubber hood. Just make sure the hood is right for your focal length or you'll get vignetting.

    Another option to have a friend hold a jacket up behind you to block anything behind you from being reflected in the window. Just make sure they hold it in front of them, so you don't get their reflection in the window instead.


Tuesday, October 12, 2021

Get the U.S. Post Office to deliver softer light from your flash unit

    In our last post, we talked about using a modifier to bounce your flash and soften its light.

    If you're using your flash in an off-camera studio setup, you might want to use something a bit more heavy duty to soften that light from the flash.

    A flash is what's known as a "hard" light. It's a bright, small, directional light source that can produce a harsh light and crisp shadows, even if you use it off the camera.

    A softbox increases the size of the light source, which softens the light, especially when combined with a diffuser in the front. It creates a more pleasing effect, especially when you're doing portrait work.

    There are commercial options for speedlight-sized softboxes, but they start at about $17, and go up from there.

    But for the same price, you could make several soft boxes, varying the sizes based on the size of your flash and how much diffusion you want.


    This particular design is made from duct tape, aluminum foil, either wax paper or cooking parchment, and a post office shipping box.

    While this softbox is not collapsible, it is more for either in studio or if you're taking it to a staged location shot.

    While any cardboard will do to make the box, I chose to use a priority mail box for my build, inspired by my maker son who uses those boxes to make carrying cases for books. I found it's a good material for this type of project:

    • It is a more sturdy cardboard than you find with some other boxes.
    • The boxes are free at the post office. (You only pay when you actually ship something in it.)

    I figured out the size I wanted for the diffuser at the end, and then measured out on the cardboard from that width, angling the size lines down to the aperture where the flash unit goes, and cut the pieces.

 
    The next step is to put a reflective material on the inside part of the box, to increase the flash's power, especially since the light is going to be diffused. You can paint it white, but I chose to use aluminum foil, shiny side out. I used a glue stick to attack the foil, but I think in future builds I might go with a spray adhesive.


    I found that duct tape was the best way to join the sides together. I used black to give it a more finished look. For the diffuser panel, I used wax paper, but I also did a later one with cooking parchment, which has a greater diffusion but costs you one stop in light.
 
    It just slips over the front of the flash, and at this size works best when the flash is mounted on either a light stand or  a tripod, although you can scale it down to fit on a camera-mounted flash.

    So, what do the pictures look like? I thought you'd never ask.

    First, here's without the box.

    As you can see, the light appears harsh, and the shadow has a crisp appearance.

    Now, with the first box I built, which is about a 10x10.

    You can see the softening in the shadows, where there's now an actual penumbra rather than a hard edge.

    Here's a smaller version I made.

    This one didn't soften the light as much, as it was a smaller box, but it's also about 2 meters from the subject.

    Finally, I made a larger, shallower box, and used parchment instead of wax paper.


    This one produced a softer light, but I also had to increase the flash power by one stop to get the proper exposure with the parchment.


Tuesday, September 28, 2021

DIY rig allows for bounced flash even when there's no ceiling to aim it.


    One of the easier ways to improve your flash photography is to bounce it off the ceiling or a wall.

    As long as the surface is white, or close to white as possible, it will soften the light and give a more pleasing appearance to the subject.

    There are just a couple problems with it, though.

    First, just bouncing off the ceiling by itself will cause shadows around the eyes and under the nose. That's because the light is only coming from above. Years ago, I got around that problem with a double-headed flash, where a smaller flash filled in the shadow areas, creating a great even light.

    Second, you need a ceiling, or at least one that's not too far away. Trying to bounce a flash off the ceiling of a Gothic cathedral or indoor stadium is not going to work as well as a standard-height ceiling.

    The solution to the problem is to use a bounce card that gives the flash something to bounce off, both filling in the shadows and allowing for a softer light in places where a ceiling bounce is clearly not practical.

    Most speedlights today are equipped to a small plastic card you can slide out that reflects some light forward while the main flash bounces off the ceiling, balancing the light. But that does not quite address the problem if you're shooting outdoors.

    There's a variety of flash modifiers out there that will allow you to bounce the flash forward, creating a softer light than a direct flash while avoiding the shadows from just an overhead lighting.

    The one I use is one I found on Pieroway.com. Unfortunately, the site has since been suspended, but fortunately it is still available on Archive.org's Wayback Machine. The site has PDFs that you can print out with the pattern for the bounce card, with the option to print one with a plain black back or one with the logos for Canon, Nikon or Sony.

    One of the things I like with this design is that it goes over the face of the flash, giving the light something to bounce off of. Other cards allow the flash to go straight out to the ceiling, which is fine if you have a ceiling nearby.

    While the site recommends printing it on card stock and making the necessary folds, I found that using two sheets of craft foam — one black and one white — works better, as it's more durable, the black layer prevents light spillage and it can be folded if you score the fold lines with an X-Acto knife.

    The site recommends attaching it with a rubber band, which I did when I used a cardstock version as a proof of concept. For the final, I used Velcro fasteners to attach to the flash unit.

    Here's what it looks like on my flash:

    But how does it work?

    Here's a photo with the flash directly on the subject, in this case a plush Opus from "Bloom County." (The following pictures only have lens corrections, color balance and sharpening applied.)

    Bouncing off ceiling.


    The flash's built-in flash card.

    The Pieroway modifier.


    What do you think?

Tuesday, September 14, 2021

Feeling the need for speed? Try slowing down

    You're taking a photo of something that's moving, and you want to convey a sense of speed, even if the subject isn't moving quickly.

    The quickest and best way to do this is to slow down your shutter speed, which will cause the moving subject to blur in its line of motion and create the illusion that it is moving quickly even if it's moving relatively slowly.


    In this picture taken near the Northern Pacific Railway Museum in Toppenish, Wash., I got a freight train going past the old depot that houses the museum. At this point, the train is passing through town and just went over a rail crossing, so it's only going about 25 mph. Not terribly fast.

    But I set my ISO to 100 and stopped down to f-29, which gave me a shutter speed of 1/5 of a second. That caused the train to blur significantly as it went down the rails, while the depot and lamp post remain clear, helping further sell the concept.

    (In case you're wondering, I actually hand-held this photo as it was a relatively spur-of-the-moment shot. Since I don't drink coffee, my hands are fairly steady. But a tripod would not hurt, especially if you want to use even slower shutter speeds.)

Tuesday, August 31, 2021

DIY fluorescent LED bulbs provide customizable lighting alternatives for photos, video


    Along with clamp lights, another option for continuous lighting are LED fluorescent tubes.

    Adam from Droi Media did a couple video tutorials in 2019 showing how to make your own light tubes, as well as a mount and dimmer for them. He estimates the costs for the lights at less than $25 a foot.

    Many of you are probably thinking that sounds pretty stiff since you can get a 4-foot LED fluorescent tube for about $63 at a warehouse hardware store. And you'd be right, except for two things: 1. That's just the tube and not the mount or the way to power the light; and 2. You have to buy a 4-foot light.

    Adam's plan allows you to customize the size of the light to fit your cases, and they don't require all the other major hardware you need to power them.

    Basically his design involves wrapping LED strip lights around a wooden dowel, attaching wires for the power supply and inserting it in a frosted tube secured by screws through the end caps and hooked up to a power supply. The hardest skill in the whole thing appears to be soldering wire.

    He also shows how to combine them on a mount with a dimmer switch. It's a great addition for your video or studio photography kit, and being LED, which can also run off batteries, used in the field as well.


Tuesday, August 17, 2021

PVC lightstands can support flash units with DIY adapter

    As promised, here's how to mount a flash unit on your PVC light stand.

    Everybody is familiar with flash units, especially on-camera flash. Some people started out with the built-in flash, but the first major upgrade is going with a speed light on the hot shoe.

    But if you want to take your flash photography to the next level, you need to get the flash off the camera, allowing you to get better lighting angles than if it's attached to the top of your camera, or on a bracket to the side.

    We won't get into how to trigger the flash, as the DIY options involve some knowledge of electronics and there are options available such as wireless transmitters or using our camera's on-board flash as a "master" to trigger the "subordinate" flashes.

    But the question is how to set the flash up away from the camera. Most speed lights nowadays come with a small cold-shoe base you can attach to the bottom of the flash. This base lets you set it on a table or shelf, but that doesn't help much when there's nothing to sit it on.

    The flash makers recognize that, and these feet have a 1/4x20 hole in the bottom to attach it to a tripod. That's a good alternative, but suppose you need the tripod for a camera, or you don't have the room to set up one or more tripods (they do take up quite a bit of real estate)?

    PVC light stands, particularly the one I built based on Scott Eggelston's (The Frugal Filmmaker) plan, take up one square foot of floor space.

    Using Scott's plan for hacking a worklight, I got a set of four 3/4" PVC end caps to make four flash mounts. While Scott just put a bolt through the cap to attach to the work light, a flash is different, since it would also need to swivel and tilt.

    I found a set of fairly heavy duty ball heads on eBay (I had asked Scott if a ball head he had used in a different project would work for a speed light, but he told me to get something with a greater weight rating.) that could hold a DSLR with lens if needed.

    I attached the head to 1/4x20 bolt through the cap, giving me a mount that can slip over the 3/4" pipe on the lightstand.


    The ball head is fully adjustable and the flash stand attaches easily and securely to it.


Tuesday, August 3, 2021

Mount your clamp light on a PVC lightstand without the clamp

    In the last post, I talked about how to double the output of a clamp light by using a two-bulb adapter.

    This time, we're going to talk about a better way to mount the lights than with the clamp.

    While the clamp offers a certain level of versatility, there are some drawbacks, especially if you're using the PVC lightstands I highlighted a couple years ago. The clamps sometimes don't grip the pipe just right and may come off at an inopportune moment, or they might throw off the balance of your stand.

    Also, if you're shooting in someone else's home, they may not want you attaching your clamp to their furniture and possibly scuffing it up. (Sometimes the rubber on the clamps wears out.)

    But there's a solution if you use the PVC light stand, as demonstrated by Ryan Connolly over at Film Riot. What Ryan did was replace the clamp with a pipe connector, allowing you to directly connect the light to the stand.

    What you need is a 3/4-inch pipe connector, a bolt, wingnut and a couple nuts if needed. Here's the basic assembly for the mount (before the light is attached).


    First, remove the clamp and get a bolt that will fit the hole that was used by the tiny bolt that held the clamp on. I wouldn't throw away the clamp, as you might want to use it if you're in a situation where you can't use a lightstand.

    Then, drill a hole through both sides of the connector to thread the bolt through. In my case, I needed to put a couple extra nuts on to ensure the clamp mount didn't come apart. On the other side, put the wingnut, as this will let you control the vertical angle of the light.

    This is the finished product, attached to a stand.

    Scott Eggleston, of the The Frugal Filmmaker, offered a similar solution for mounting shop lights on a PVC stand, except using end caps.

    In our next post, I'll show you how to use that technique for flash units.

Tuesday, June 1, 2021

Double the output of your home studio clamp lights

    Photographers moving beyond "natural light" toward studio lighting usually start out with continuous lights.

    It's not a bad idea, as it is a more "what you see is what you get" approach that helps you see the effect light placement and modifiers have before you hit the shutter. Continuous lights are also a necessity for anyone shooting video.

    One of the most economical ways to get a light set up is to use the clamp lights you find at home improvement stores. They're the lights in metalic reflectors that have a clamp you can attach to a stand, shelf or other object to position the light.

    However, one of the limitations of the light is that they only take one light bulb, and finding bulbs with high enough lumens for a reasonable shutter speed can be difficult. And if you are using halogen bulbs, you're going to run into a wattage limit on the lamp as well as overheating issues.

    But there is a way to boost the light output without turning the studio into a sauna or risking an electrical overload.

    For starters, go with LED lamps. They produce the same amount of light for a fraction of the energy, which means they don't heat up as much. That comes in handy if you need to put a diffuser or color gel on the front of the light. Growing up, I can remember a few lamp shades that were damaged because they got too close to the bulbs.

    LEDs also come in different color temperatures, so you can get daylight-balanced lights or go with tungsten and set your camera to the precise color temperature, saving you a bit of work in post production.

    But you still have the issue of just one light socket in the lamp. But there's a way around that, and I have to give credit to The Frugal Filmmaker, Scott Eggleston, for this idea.

    The Home Depot and other hardware stores sell twin-socket lamp adapters. They screw into the socket and give you two light sockets, allowing you to put two bulbs in, doubling the light output.

    In my setup, I use brooding lamps, which offers both a larger reflector as well as having a 300-watt rating, giving me more than enough margin for safety. In the lamp, I have two daylight-balanced 100-watt-equivalent LED bulbs that throw out a tremendous amount of light.


    It's a setup that provides a decent lighting system for both video and studio photos, whether you're doing portraits or just photos for your eBay/Etsy/Amazon page.