Search This Blog

Tuesday, March 28, 2023

Selfie sticks can take your photography down the rabbit hole, and other low places

    In our last post, we talked about using a monopod to give your camera a view from above.

    But sometimes you want to take a camera low, or into a place that's tight. A selfie-stick provides a great opportunity to get unique angles with a cellphone camera.

    Selfie sticks are good for this because they are extendable and you don't need to hit the on-screen button to trip the shutter.

    If you haven't seen one yet, a selfie stick is a device you can mount a cellphone camera on and, using either a Bluetooth trigger or a plug in the earphone port (sorry iPhone users. Blame Tim Cook), you can take a picture by pressing a button on the handle.

    The original idea for this was taking a picture with the front camera on the phone, allowing you to hold the camera farther out than your arm's length, thus getting a better-looking picture (that wide-angle lens on a cellphone's front camera is not your friend) or get more people in the shot.

    I bought one at the local dollar store because the mounting clip would also work on a tripod, but I found uses for the stick, such as doing video.

    But we discovered you can use it to get a camera either really low without having to crawl around on the grass, or use it to view under things or to look inside small spaces.

    We were raising some rabbits who decided they'd rather raise their kittens (yes, that's the correct term for baby rabbits, not bunnies) underground rather than a nesting box in their enclosure. After the litter was raised, we were going to close off the hole to ensure they didn't try to reenact The Great Escape. (They actually gnawed through chicken wire to dig the hole in the first place.)

    But before we started, one of my sons had the idea to see what it looked like inside the hole. So, I got my selfie stick out, put my old cellphone in the clip and hooked up the shutter cable, and we lowered it inside, with the "flash" set to automatic.

    As you can see, we got a decent look at the inside of the rabbit hole.

    No, we didn't find any girls named Alice down there.

    If you're going to do something like that, make sure the phone is secure on the end of the stick, even if you have to wrap a rubber band around it.


     *Let's be honest. When a cellphone uses its "flash" it's just quickly turning the LED flashlight on and off. It's not a real flash in the sense of a sudden burst of light as a capacitor discharges into a tube.)

Tuesday, March 14, 2023

Using a monopod can elevate photography to new heights

    Sometimes, the difference between a good photograph and a great photograph is a matter of perspective.

    Just getting a higher view can provide a better perspective at times. But sometimes getting that angle is more easily said than done. There may not be a place where you can climb up, or bringing in a ladder would be impractical.

    Drones offer one way to get your camera above the crowd, but they can be expensive, sometimes require licensing to use and in some places are illegal.

    But there is a way that you can get at least some altitude with your camera even in places where you can't legally deploy a drone.

    In a 2013 video, Joe Edelman suggests using a monopod to elevate your camera to get a better perspective. He suggests putting the camera on the monopod, activate the self-timer and then hoist it up and wait until the shutter trips.

    There are a few caveats. You have to use a wide-angle lens and a small aperture in order to get the greatest depth of field. And, unless you're working with someone who can monitor the camera through wired or wireless tethering, it might take a few tries to get the shot right.

    I decided to give it a try with a veterans memorial in Sunnyside, Wash. The memorial consists of tablets on a block-long plaza. As you can see from a straight-on shot, it doesn't look too interesting.

    But raising the camera more than 10 feet creates a better perspective. 

    While Edelman suggests tipping the monopod forward to get an angle, I have a tilt-pan head on mine, so I could adjust the angle before raising it.

    In the video, Edelman suggests using a painter's pole if you want to get more elevation. Frankly, I wouldn't put a really good camera up on one, for fear of an accident, or make sure it was the best pole ever made.   

Tuesday, February 28, 2023

DIY snoot delivers light to right where it's needed

    Electronic flashes are easily one of the great innovations in photography, making it easier to get indoor photos.

    But when you're ready to get past the harsh light coming from either on top of the camera or alongside it, there are a variety of ways to modify the light, either commercially or homemade, and go for a more artistic look.

    In previous posts, we've talked about softboxes and reflectors take the edge off the flash's harsh light, and an adapter for macrophotography.

    Today's installment deals with snoots, which turn the flash into a spotlight, putting a small relatively tight spot of light on a subject.

    While a grid, which we talked about building earlier, may seem to do the same thing, there's a difference. The grid's honeycomb pattern not only directs the light into a tighter area, it also feathers the edges so it's not so harsh.

    A snoot instead throws a sharply defined beam of light at its target. This can be good for creating a hairlight to separate your subject from a background or to create a shaft of light effect.

    My DIY snoot consists of postal box cardboard formed around the flash head, creating a tube that funnels the light forward. While some have used Pringles potato chip cans for this purpose, I found it was too narrow to put my flash head in straight on, and the bouncing in the macro tube was not effective for long distance.

        Now, to see how it works

    First, a photo with the unmodified flash, to serve as the baseline.

    With our DIY grid. See how it's a narrower beam but just fades off on the edges.

    The snoot produces a tight, harsh light. If you wanted to create the look of a shaft of light, this would be an effective tool for the job.

Tuesday, February 14, 2023

Work flashlight can aid aiming speedlights in studio settings

     When you start using off-camera flashes, usually the first lights you're going to use are your speed lights.

    One drawback with they have, compared to their larger, brighter studio cousins, is the lack of a modeling light.

    A modeling light is a small lamp, incandescent or now, LED, that shows the photographer where the light from the flash will fall, especially if it's used with a modifier. You likely saw these if you ever went to a photo studio for a portrait, or when you had photos taken at school; it's that glow you see coming from the umbrellas or softboxes before the picture's taken.

    Modeling lights are helpful if you're trying to set up a Rembrandt lighting (that's when one side of the face is illuminated more than the other side, but you have that triangle of light on the cheek on the darker side), or trying to adjust a rim light.

    You can still work without a modeling light, but that can involve quite a bit of trial and error, which might not go over well with some subjects who might question your competence behind the camera.

    But there is a way to at least get a similar effect and get your lighting within the ballpark, and just require a little bit of fine-tuning.

    Remember the flashlights I mentioned earlier as a night-photography light? You can use that as a makeshift modeling light.

    And it will only set you back 99 cents at Harbor Freight, unless you catch one of their free giveaways.

    For this to work, you make sure the main light is on, and center it over your flash head, or the center of your softbox. This will show you where the light is generally falling, and you can adjust the light's position as needed.

    It won't be as WYSIWYG* as a modeling light, but it will give you the general idea of where your light is going to go, and that should mean fewer adjustments when you start shooting.


    *What you see is what you get. It's a term first coined when word processors began to show you how your document would actually look with the chosen fonts and text styles.

Tuesday, January 31, 2023

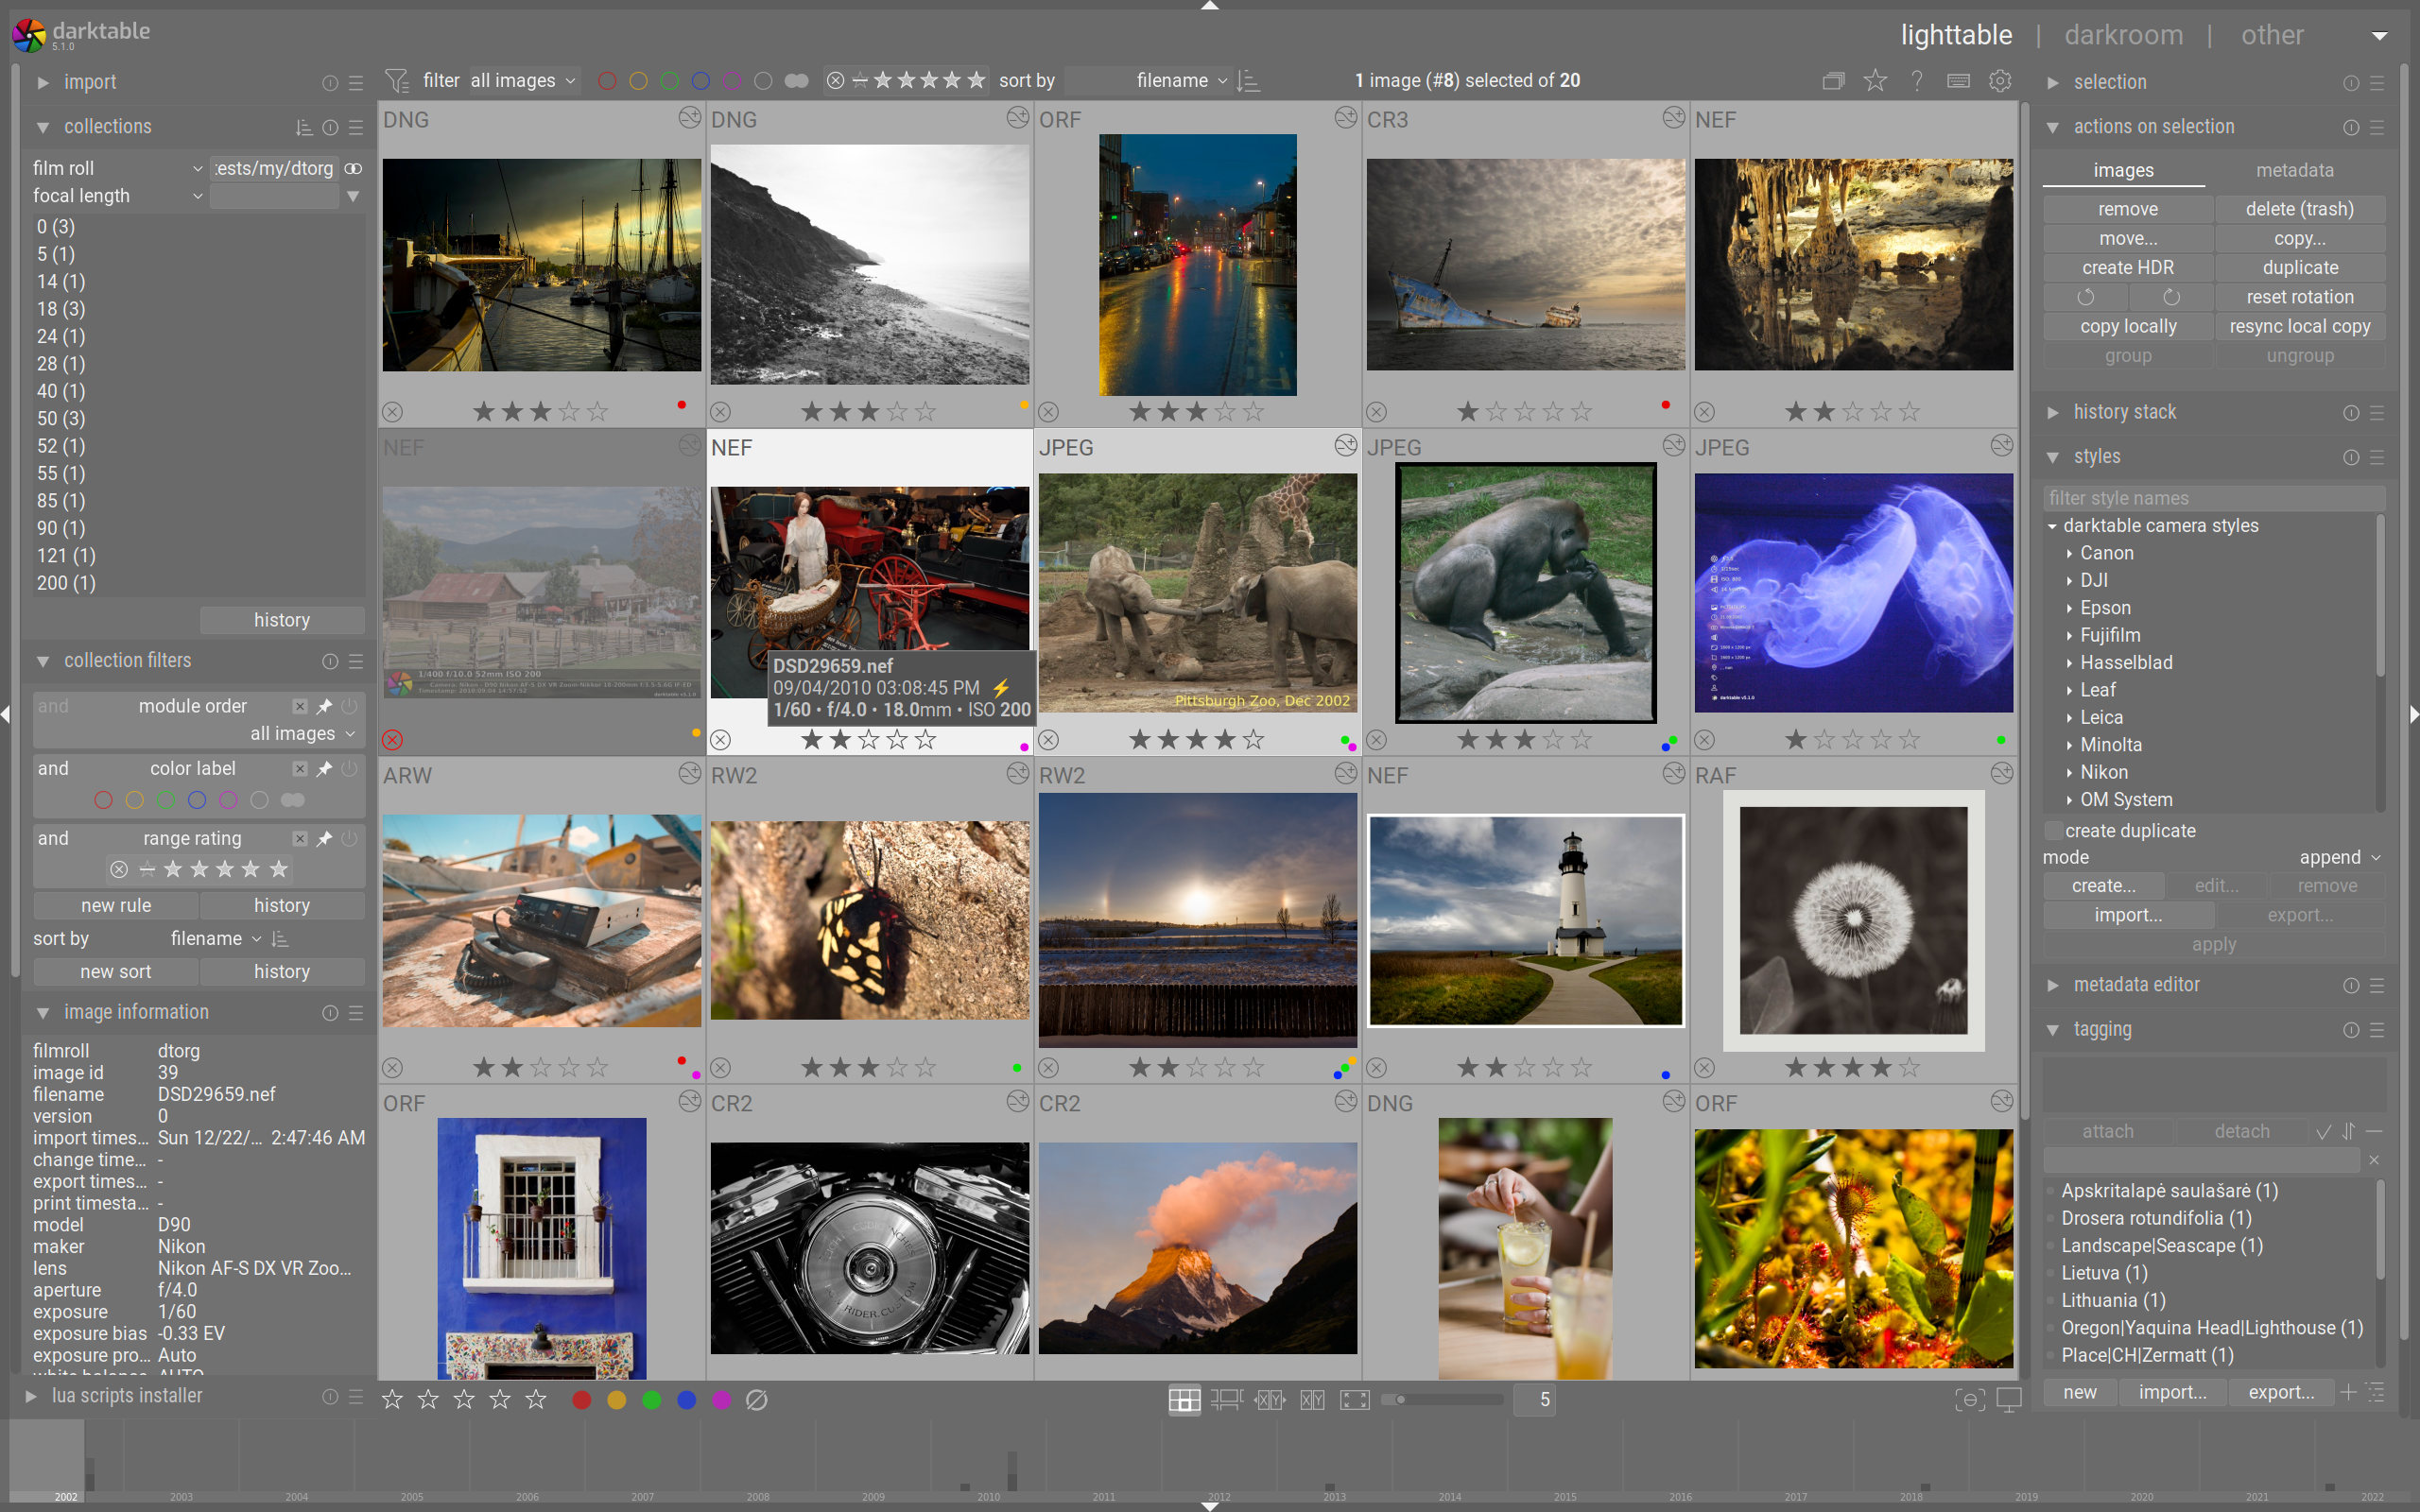
Darktable provides a satisfactory, free alternative to Adobe Lightroom Classic


    Years ago, I used to consider Adobe Lightroom (now Adobe Lightroom Classic) as Photoshop with training wheels.

    My thinking was that Photoshop was a much more powerful editor, so why waste time on Lightroom.

     But I decided to give it a try, and found it to be a versatile program, becoming my go-to for editing, as well as an excellent digital asset manager, allowing me to easily organize a catalog of more than 50,000 images.

    While it's a great program, it also comes with a high price, and with Adobe embracing the shakedown subscription plan, you pay for it monthly.

    There are "Jack Sparrow" versions out there, but there is one free, open-source program that is a rather acceptable alternative to Lightroom. In fact, I use it for my work, since we are only allowed so many software licenses and they're already in use and my bosses don't want a visit from the software police.

    I had tried earlier versions of darktable before when I needed a RAW file editor that I could install on a work computer without running afoul of the IT department. While it was a good editor, it lacked the ability to catalog, keyword, geotag and impose order on the chaos of picture files.

    But since version 4 has come out, darktable is giving Lightroom a run for its money. It has become a true DAM, allowing you to actually import photos to a specific location, add keyword tags, geotag them using a GPX tracklog, as well as edit them and export.

    I've been especially impressed with the noise-reduction algorithms, which I find give great results just by activating them. There's also an option to go in and further refine it.

    The control layout is not as intuitive as Lightroom's, but you have the option to search for the tool you are looking for.

    In addition to editing RAW files, darkroom can also handle jpg, tif and even the dreaded WebP file format.

    (That's Google's new image format that web developers are now using just because Google says it's cool, even though it's a departure from the company's motto "Don't Be Evil.")

    It's free, and if you can write code, it's open source so you can modify it if you so choose. It's available on Mac, Windows and Linux, and it can interface with GIMP, the open-source version of Photoshop.