Search This Blog

Tuesday, December 7, 2021

DIY hack lets you get Gary Fong-like lighting from your speed light

    Speed lights, or flashes as we used to call them, are great for getting lighting where it's needed.

    But, in their basic, unmodified state, they produce a light that's pretty hard and not flattering. 

    So far, I've shown how you can make bounce cards and soft boxes that will take the edge off that harsh light and make your subject look better.

    Another device for doing this is the Lightsphere developed by Gary Fong. It's essentially a translucent plastic-and-silicone sphere that attaches to your flash and provides a diffused light for your subject.

    I remember seeing one in a picture of a press scrum at a Mitt Romney campaign event and joking that it looks like Mystery Science Theatre 3000's Tom Servo is a Romney supporter. 

    The concept is actually quite good, especially when you're in places where there isn't a white ceiling and/or wall to bounce a flash.

    But it comes with a $70 price tag, which can be a "hard nope" for some people.

    However, there's a way to get the same effect at a fraction of the price, and all it requires is a trip to the local department store for a few odds and ends. Specifically, you'll need a plastic drawer/shelf liner (not the self-adhesive kind) and velcro tape.

    As shown on Instructables, you cut a 15-by-6-inch piece out of the shelf liner, apply the velcro on the narrow ends of the piece on opposite sides and then you wrap it around your flash.

DIY Gary Fong Lightsphere

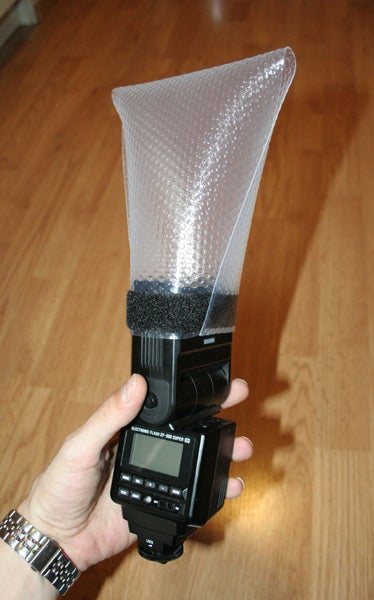
    It should look like this when you're done. (Photo credit: Arthur Gajewski, cc-by-sa)

    You'll notice it appears to be sideways on the flash, but that allows you to effectively use it whether you're holding the camera in a landscape or portrait orientation.

     So, how does it work?

    Allen Mowery did a Youtube video demonstrating. Check it out. I think I'll be adding one to my ever cramped camera bag.


Tuesday, November 23, 2021

Household photography hacks

    When he was the host on DigitalRev TV, Kai Wong did a video showing a few DIY photo hacks done mostly with items found around the house.

    Among the hacks he shows are filling a bag with popcorn kernels to use as a makeshift stabilizer, using a couple key rings and zip ties to hook a strap to your tripod and using an old nylon stocking as a soft-focus filter.

    Some of the hacks are worth trying out, although if you are going to do the Vaseline diffuser, I would probably get a cheap UV filter dedicated to that rather than trying to hold up a sheet of glass in front of your lens.

    Do any of these interest you? Or do you have a suggestion on household photo hacks?

Tuesday, November 9, 2021

How to turn a dishpan and cake dish into a monster DIY studio light

    If you are looking for a way to really light up what you are shooting, you might want to take a trip to the kitchen aisle of the local store.

    Griffin Hammond, of Indy Mogul fame, did this video showing his plans for a DIY studio light that had the output of the equivalent of 13 60-watt incandescent light bulbs. While the video is about nine years old, his idea is still a good one.

    His light uses a deep plastic dishpan for a reflector around the lights, which are in socket splitters in four light sockets, with the cake pan serving as the electrical box for the rig.

    Griffin's rig uses eight 100-watt-equivalent CFL bulbs, but LED bulbs should work just as well. He estimated the cost of the rig at $85, but it's not a bad price if you compare it to a commercial rig with similar output.

    You can also lower that price point by purchasing some of the supplies at your local dollar store instead of the big box stores. You'll probably still need to go to the hardware store for the lighting rigs.

    Griffin's rig requires some knowledge of electrical wiring, and his video doesn't clearly show the wiring pattern. If you'd rather not bother with making your own electrical circuits, some of the commenters on the video suggested using a power strip with plug-in light sockets, simplifying that part of the project.

    I would probably paint the outside of the pan black, giving it a better appearance as well as minimizing light spill.

    From his video, it looks like a great option if you're shooting video or prefer to use continuous lighting in your photo studio.


Tuesday, October 26, 2021

Getting close to eliminate reflections

    There are times when you want a reflection in you picture for artistic purposes, but there are more than a few times when it's a pain in the tuchus.

    This usually happens when what you're photographing is behind glass, such as in a display case, you're looking out a window or standing on top of the Space Needle in Seattle, where even on the outdoor deck you're behind glass.

    Some ways to get rid of the reflection, if it's ruining your composition, include changing your angle so the reflection isn't going straight into your camera lens (angle of incidence = angle of reflection) or using a polarizing filter.

    The only drawbacks with those methods is you might be limited in moving to the sides, and the light may be at the wrong angle for a polarizer, which works best when the light's coming from a right angle.

    While reflections can be eliminated in post (I had to do that with a picture I took of a stained glass window in a museum), that can be extra work you wouldn't need to do if you can eliminate the reflection before you trip the shutter.

    But Jefferson Graham, a writer/photographer/Youtuber, suggests getting right up against the glass.

    It's not a bad strategy, as you are blocking the light causing the reflection from your lens.

    (Do not try this tip with a museum display case. You may either knock over the display or set off an alarm.)

    The only thing I take issue with him on this matter is his suggestion that this option only works with phone cameras, as they typically have a flat lens. A DSLR, he argues, has a curved lens and can't be put in such contact.

    To which I call shenanigans.

    First, most of us use UV or skylight filters on the front of our lenses to protect them from damage, so we do have a "flat" surface to put against the glass.

    Second, a lens hood also provides the shading that can keep the stray light from messing up your photo. It works especially well if you have a collapsible rubber hood. Just make sure the hood is right for your focal length or you'll get vignetting.

    Another option to have a friend hold a jacket up behind you to block anything behind you from being reflected in the window. Just make sure they hold it in front of them, so you don't get their reflection in the window instead.


Tuesday, October 12, 2021

Get the U.S. Post Office to deliver softer light from your flash unit

    In our last post, we talked about using a modifier to bounce your flash and soften its light.

    If you're using your flash in an off-camera studio setup, you might want to use something a bit more heavy duty to soften that light from the flash.

    A flash is what's known as a "hard" light. It's a bright, small, directional light source that can produce a harsh light and crisp shadows, even if you use it off the camera.

    A softbox increases the size of the light source, which softens the light, especially when combined with a diffuser in the front. It creates a more pleasing effect, especially when you're doing portrait work.

    There are commercial options for speedlight-sized softboxes, but they start at about $17, and go up from there.

    But for the same price, you could make several soft boxes, varying the sizes based on the size of your flash and how much diffusion you want.


    This particular design is made from duct tape, aluminum foil, either wax paper or cooking parchment, and a post office shipping box.

    While this softbox is not collapsible, it is more for either in studio or if you're taking it to a staged location shot.

    While any cardboard will do to make the box, I chose to use a priority mail box for my build, inspired by my maker son who uses those boxes to make carrying cases for books. I found it's a good material for this type of project:

    • It is a more sturdy cardboard than you find with some other boxes.
    • The boxes are free at the post office. (You only pay when you actually ship something in it.)

    I figured out the size I wanted for the diffuser at the end, and then measured out on the cardboard from that width, angling the size lines down to the aperture where the flash unit goes, and cut the pieces.

 
    The next step is to put a reflective material on the inside part of the box, to increase the flash's power, especially since the light is going to be diffused. You can paint it white, but I chose to use aluminum foil, shiny side out. I used a glue stick to attack the foil, but I think in future builds I might go with a spray adhesive.


    I found that duct tape was the best way to join the sides together. I used black to give it a more finished look. For the diffuser panel, I used wax paper, but I also did a later one with cooking parchment, which has a greater diffusion but costs you one stop in light.
 
    It just slips over the front of the flash, and at this size works best when the flash is mounted on either a light stand or  a tripod, although you can scale it down to fit on a camera-mounted flash.

    So, what do the pictures look like? I thought you'd never ask.

    First, here's without the box.

    As you can see, the light appears harsh, and the shadow has a crisp appearance.

    Now, with the first box I built, which is about a 10x10.

    You can see the softening in the shadows, where there's now an actual penumbra rather than a hard edge.

    Here's a smaller version I made.

    This one didn't soften the light as much, as it was a smaller box, but it's also about 2 meters from the subject.

    Finally, I made a larger, shallower box, and used parchment instead of wax paper.


    This one produced a softer light, but I also had to increase the flash power by one stop to get the proper exposure with the parchment.